
Plep
Plepping is the new planning.
Plep works and looks like a real agenda, but with the advantages of having it on your computer.
Downloads
Latest stable version:

Latest pre-release version:

We try to adhere to Semantic Versioning. An update with a new first number means it won’t work with your old database.
Features
- Drag and drop
- Custom labels
- Subtasks
- Custom colours
- Repeat for x weeks
- Customize number of days and columns
- Turn pages by a custom amount of days
- Deletion and undoing deletion
- Plep will remember all deleted tasks until you close it.
Note: The first time plep is ran, it will create a database file in the folder where the jar is stored. Check for this file, otherwise your data won’t be saved. You can backup this if you don’t want to lose your data.
Updating Plep on Linux
Because of file permissions, an empty database with the correct permissions is created in /usr/lib/plep/lib/plep.db when the package is installed.
If you want to reuse an old database, backup that first and then replace it again (e.g. with cp -a --remove-destination plep_backup.db /usr/lib/plep/lib/plep.db).
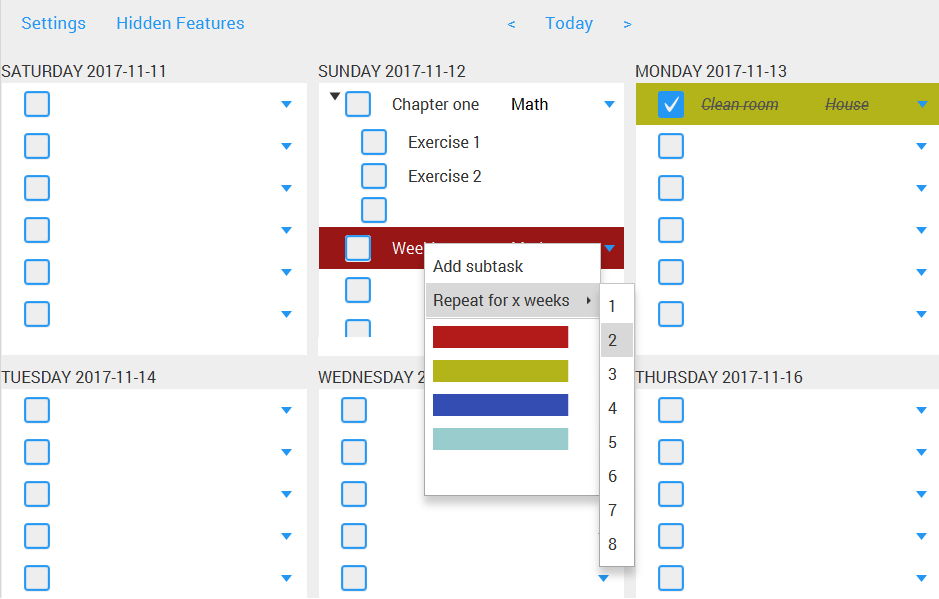
Screenshot of v2.0.0
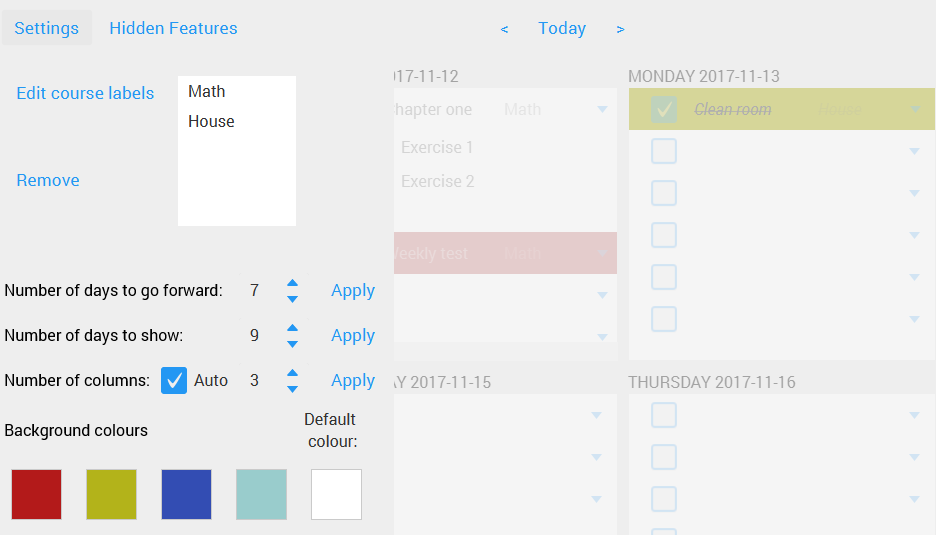
Settings of v2.0.0
Instructions for building from source in IntelliJ
To install java on Fedora, install the java-openjdk-devel package (the regular openjdk only contains the jre, and not the jdk).
Make sure you have JavaFX installed, for example on Arch Linux and Fedora you can install the java-openjfx package. If javafx still cannot be resolve, delete and re-add the SDK.
- To run or debug, use the Gradle task
run. - To build an executable jar, use the task
build, the file is then inbuild/libs/. - To run tests from IntelliJ, install the Spek (and possibly also Spek Framework) plugin.
Building a Windows release
- Update the version number in
build.gradle.kts - Run the gradle task launch4j/createExe
- Open InnoSetup on the setup file in
releasing/Windows/innoSetup/PlepInstaller.iss - Update the version number
- Click Build | Compile, the generated installer will be next to the setup file.
- If Plep doesn’t start, some exception was thrown. Try the Gradle task ‘shadowJar’ and execute the jar file generated in build/libs with java -jar plep-vx.x.x-all.jar.
Building an Arch Linux release
- Update the version number in
PKGBUILDandbuild.gradle.kts - Make sure you have everything pushed (you don’t have to have the
PKGBUILDpushed, but all the other build files) - Go to
releasing/arch-linux - Run
makepkg -for to only repackagemakepkg -f --repackage - The generated package file will be
plep-vx.x.x-1-any.pkg.tar.xz - Check that it contains the right files with
pacman -Qlp plep-vx.x.x-1-any.pkg.tar.xz - Install with
sudo pacman -U plep-vx.x.x-1-any.pkg.tar.xz
Building a Fedora release
- Make sure you have the
rpm-buildandrpmdevtoolspackages installed. - Compress the sources into a
tarfile, using (in theplepdirectory):tar czf ~/rpmbuild/SOURCES/plep-x.x.x.tar.gz file1 file2 file3 ... filen. You should include (at least) the following files/directories: -./gradle-./releasing/fedora(it contains theplep.desktopfile) -./src-build.gradle.kts-gradlew-gradlew.bat-LICENSE-settings.gradle.kts - Update the version number in
plep.specandbuild.gradle.kts. - Go to
releasing/fedora. - Run
rpmbuild -bb plep.specto create the rpm file. This will create the rpm file in~rpmbuild/RPMS/noarch/. - Install the rpm with
rpm -Uvh plep-x.x.x-y.fc29.noarch, wherex.x.xis the version number, andythe release number.
Javadoc (obsolete)
Badges with thanks to shields.io.